チュートリアル: Cinemachine と Input System (InputActionReference) を使ったマウスによるズーム機能の実装
目次
チュートリアル概要
本チュートリアルでは、Unity の Cinemachine Camera と新しい Input System の InputActionReference を用いて、マウススクロールによるズーム機能を実装する2つの方法を紹介します。
- 方法①: レンズの Field of View (FOV) を変更する方法
パースペクティブカメラの場合、FOV を変更することで画面全体に映画的なズームイン/アウト効果を与えます。 - 方法②: Follow Offset(カメラ位置)の Z 軸値を変更する方法
Cinemachine の Transposer(ここでは CinemachineFollow コンポーネント)を利用し、カメラとターゲットとの相対距離を直接調整することでズーム効果を実現します。
1. 事前準備
必要なパッケージ
- Cinemachine:
Unity Package Manager からインストールしてください。 - Input System:
同じく Package Manager からインストールし、有効化してください。
※プロジェクト設定の「Active Input Handling」を「Input System Package (New)」または「Both」に設定します。
シーンのセットアップ
- Cinemachine Camera を配置:
Hierarchy から Cinemachine > Cinemachine Camera を選択し、シーンに追加します。 - ターゲットの用意:
ズームの対象となるオブジェクト(例:キャラクターやカメラが追従するオブジェクト)をシーンに配置し、Cinemachine Camera の Tracking Target に設定します。
InputAction アセットの設定
- InputAction アセットの作成または編集:
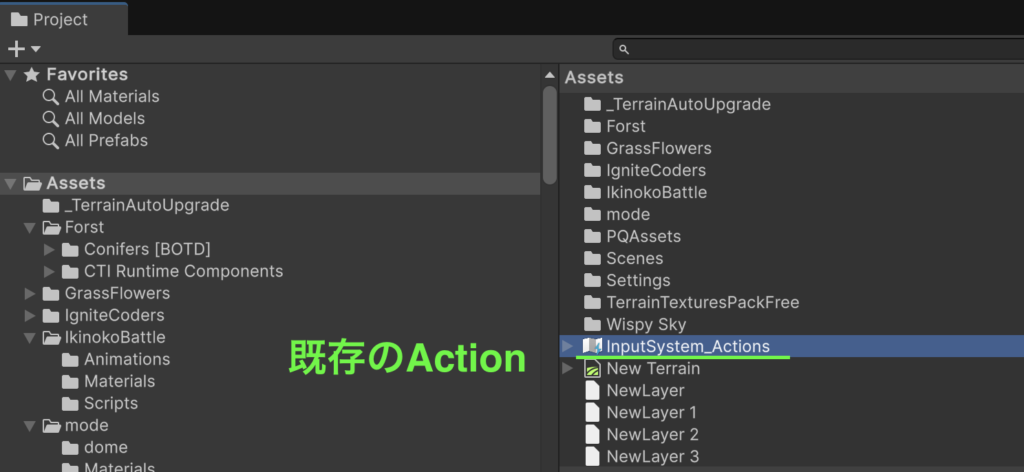
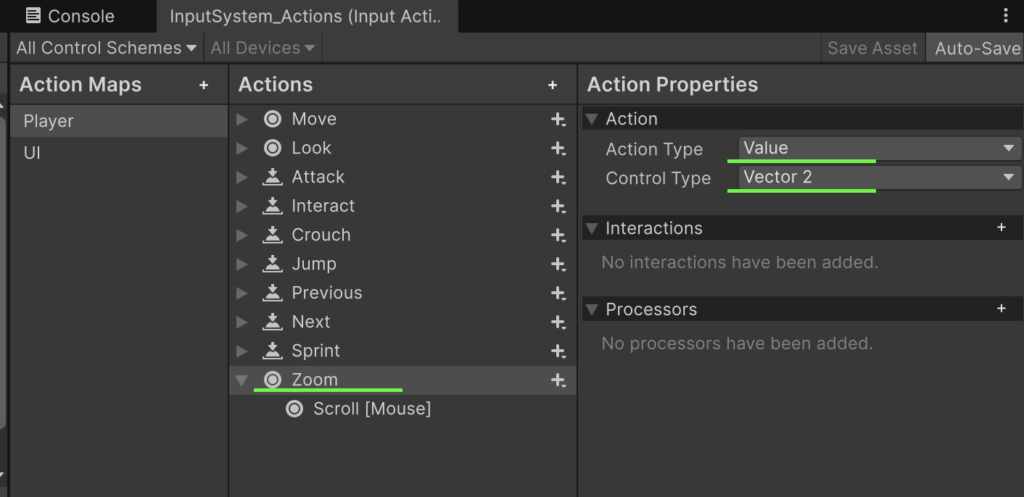
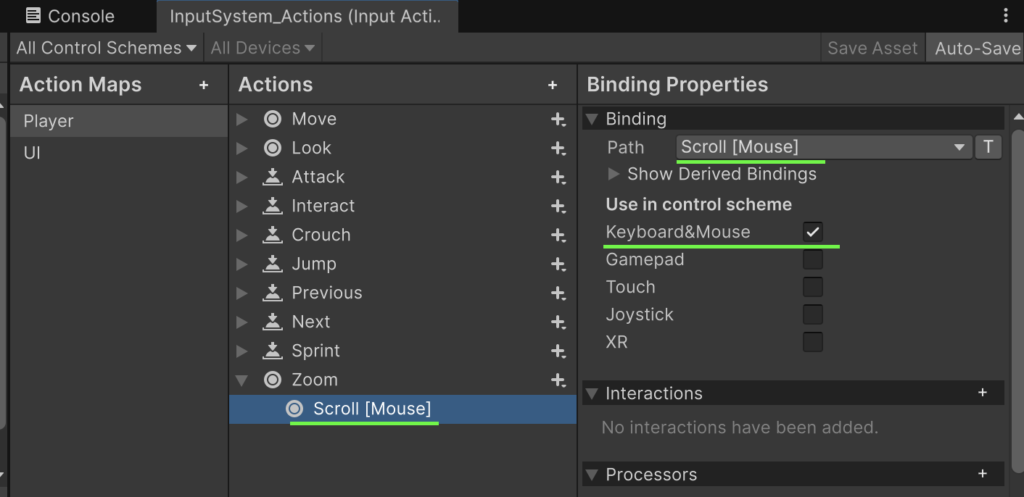
Project ウィンドウで右クリック → Create > Input Actions として新規作成、または既存のアセットを使用します。 - Zoom アクションの追加:
- アクション名例:
Zoom - Action Type:
Value - Control Type:
Vector2 - Bindings: 「
<Mouse>/scroll」を設定し、スクロールホイールの入力を取得できるようにします。
- アクション名例:
- アセットの保存:
変更を保存しておきます。
参考)既存のアセット(アクション)


2. 方法①:レンズの FOV を変更するズーム
概要
パースペクティブモードでは、レンズの Field of View (FOV) を変更することで、映画的なズームイン/アウト効果が得られます。
InputActionReference を使用して、作成済みの Zoom アクションからマウススクロール入力を取得します。
サンプルコード
using UnityEngine;
using UnityEngine.InputSystem;
using Unity.Cinemachine;

public class ZoomByFOV_InputSystem : MonoBehaviour
{
    public CinemachineCamera virtualCamera;

    // InputActionReference を利用して Zoom アクションを参照する
    public InputActionReference zoomActionReference;

    public float zoomSpeed = 10f;
    public float minFOV = 20f;
    public float maxFOV = 60f;

    void Update()
    {
        // InputActionReference からアクションを取得してスクロール入力を読む
        float scrollValue = zoomActionReference.action.ReadValue<Vector2>().y;
        if (Mathf.Abs(scrollValue) > 0.001f)
        {
            float newFOV = virtualCamera.Lens.FieldOfView - scrollValue * zoomSpeed;
            virtualCamera.Lens.FieldOfView = Mathf.Clamp(newFOV, minFOV, maxFOV);
        }
    }
}
ポイント
- zoomActionReference:
Inspector 上で、InputAction アセット内のZoomアクションを参照として設定します。 - FieldOfView の変更:
マウススクロールの Y 軸の値を読み取り、ズームスピードに応じて FOV を調整します。Mathf.Clampを利用して、FOV がminFOVとmaxFOVの間に収まるように制限します
3. 方法②:Follow Offset を変更するズーム
概要
Cinemachine の Cinemachine Follow コンポーネントを利用して、カメラとターゲット間の距離(Follow Offset の Z 軸)を変更することでズーム効果を実現します。
こちらも InputActionReference を用いてスクロール入力を取得します。
サンプルコード
using UnityEngine;
using UnityEngine.InputSystem;
using Unity.Cinemachine;

public class ZoomByFollowOffset_InputSystem : MonoBehaviour
{
    // シーン内の Cinemachine Camera を Inspector でアサイン
    public CinemachineCamera virtualCamera;

    // InputActionReference を使って Zoom アクションを参照
    public InputActionReference zoomActionReference;

    // ズームスピードと Follow Offset の最小・最大 Z 値を設定
    public float zoomSpeed = 5f;
    public float maxFollowOffsetZ = -10f;
    public float minFollowOffsetZ = -30f;

    // CinemachineFollow コンポーネントの参照を保持
    private CinemachineFollow followComponent;

    void Start()
    {
        // Virtual Camera から CinemachineFollow コンポーネントを取得
        followComponent = virtualCamera.GetComponent<CinemachineFollow>();
        if (followComponent == null)
        {
            Debug.LogError("CinemachineFollow コンポーネントが見つかりません。");
        }
    }

    void Update()
    {
        // InputActionReference からマウススクロール入力 (Vector2) の y 軸の値を取得
        float scrollValue = zoomActionReference.action.ReadValue<Vector2>().y;
        if (Mathf.Abs(scrollValue) > 0.001f && followComponent != null)
        {
            // 現在の Follow Offset を取得し、スクロール入力に応じ Z 軸を調整
            Vector3 followOffset = followComponent.FollowOffset;
            followOffset.z += scrollValue * zoomSpeed;
            followOffset.z = Mathf.Clamp(followOffset.z, maxFollowOffsetZ, minFollowOffsetZ);
            followComponent.FollowOffset = followOffset;
        }
    }
}
ポイント
- Cinemachine Follow の利用:
Cinemachine Follow コンポーネントを取得し、Follow Offset の管理を行います。 - Follow Offset の変更:
マウススクロール入力に応じて、カメラとターゲット間の距離(特に Z 軸)を調整します。
4. スクリプトの設定とテスト
- スクリプトのアタッチ:
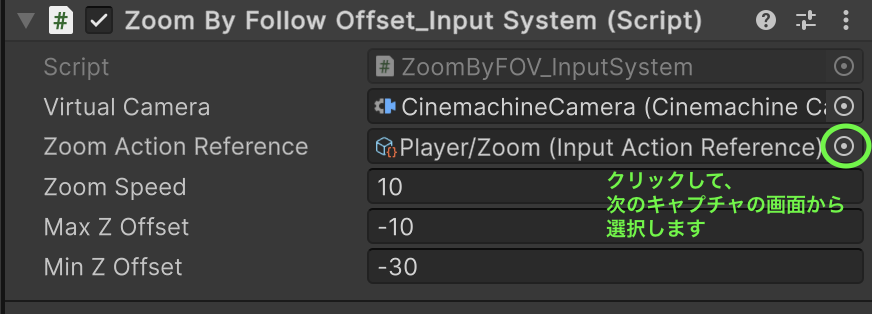
作成したZoomByFOV_InputSystemまたはZoomByFollowOffset_InputSystemのいずれかを、専用の空の GameObject などにアタッチします。 - Inspector の設定:
- Virtual Camera:
- シーン内の Cinemachine Camera をアサインします。
- Zoom Action Reference:
- InputAction アセット内の Zoom アクションを含む InputActionReference を、Inspector 上で登録します。
- Virtual Camera:
- シーンの実行:
シーンを再生し、マウススクロールホイールでズームが正しく動作するか確認してください。


5. まとめ
- InputActionReference の活用:
InputActionReference を用いることで、InputAction アセット内の Zoom アクションを Inspector 上で簡単にアサインでき、管理が容易になります。 - 実装方法の選択:
- レンズの FOV 変更:
- パースペクティブの変化により、映画的なズームイン/アウト効果を実現します。
- Follow Offset 変更:
- カメラとターゲットの相対位置を維持しつつ、ズーム効果を得ることができます。
- レンズの FOV 変更:
- 用途に応じた組み合わせ:
どちらか一方、または両方を組み合わせることで、プロジェクトの演出に最適なズーム効果を実現できます。
このチュートリアルを通して、Cinemachine と新 Input System (InputActionReference) を活用したズーム機能の実装方法を理解し、プロジェクトに応用できるようになってください。
訪問数 198 回, 今日の訪問数 1回


ディスカッション
コメント一覧
まだ、コメントがありません