【C#】DataGridViewのセルを書式設定する ~条件付き書式とDefaultCellStyle~
DataGridViewでデータを表示していると、「マイナスの数値だけ赤字にしたい」「特定の条件を満たす行を目立たせたい」といった場面がよく出てきます。本記事では、セルの見た目を制御する2つの方法、DefaultCellStyleによる静的な書式設定と、CellFormattingイベントによる条件付き書式を紹介します。
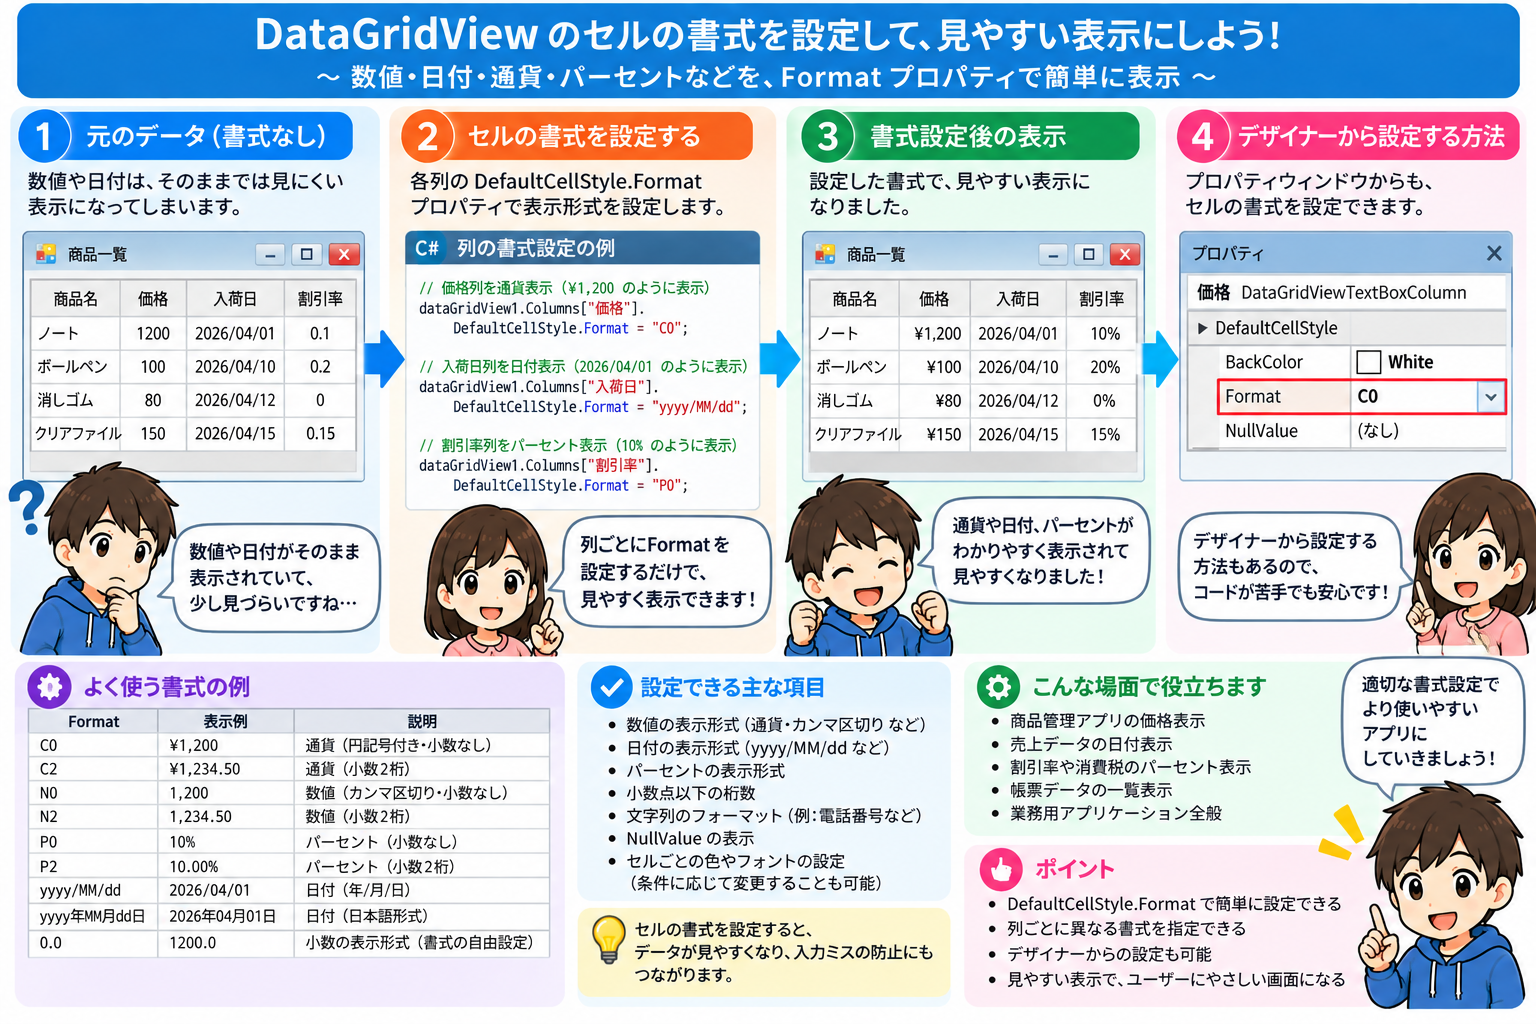
1. DefaultCellStyleで基本的な書式を設定する
まずは列・行・セル単位で共通の見た目を指定する方法です。DataGridViewは階層的にスタイルを適用でき、優先順位は「セル個別 > 行 > 列 > DataGridView全体」の順になります。
// 列全体の書式(数値を3桁区切り+右寄せに)
dataGridView1.Columns["Price"].DefaultCellStyle.Format = "N0";
dataGridView1.Columns["Price"].DefaultCellStyle.Alignment = DataGridViewContentAlignment.MiddleRight;

// 偶数行の背景色を変える(縞模様)
dataGridView1.AlternatingRowsDefaultCellStyle.BackColor = Color.WhiteSmoke;

// 個別セルだけ書式を変える
dataGridView1.Rows[0].Cells["Price"].Style.ForeColor = Color.Red;
FormatプロパティはToStringの書式指定子がそのまま使えるので、日付なら"yyyy/MM/dd"、パーセントなら"P1"のように指定できます。
2. CellFormattingイベントで条件付き書式を実装する
DefaultCellStyleは「常にこの見た目」という静的な設定です。一方、値によって見た目を変えたい(条件付き書式)場合はCellFormattingイベントを使います。表示のたびに呼ばれるイベントで、セルの値を見て動的にスタイルを変更できます。
private void dataGridView1_CellFormatting(object sender, DataGridViewCellFormattingEventArgs e)
{
    // Price列だけを対象にする
    if (dataGridView1.Columns[e.ColumnIndex].Name != "Price") return;
    if (e.Value == null) return;

    if (decimal.TryParse(e.Value.ToString(), out decimal price))
    {
        if (price < 0)
        {
            e.CellStyle.ForeColor = Color.Red;
            e.CellStyle.Font = new Font(dataGridView1.Font, FontStyle.Bold);
        }
        else if (price >= 10000)
        {
            e.CellStyle.BackColor = Color.LightYellow;
        }
    }
}
イベントハンドラはデザイナーの プロパティ > イベント からCellFormattingをダブルクリックすると自動生成されます。
3. 行全体を条件付きで強調する例
在庫管理アプリなどで「在庫数が0の行を赤くする」といった、行全体に条件付き書式をかけたいケースもよくあります。この場合はCellFormattingの中で行の他のセルも参照して判定します。
private void dataGridView1_CellFormatting(object sender, DataGridViewCellFormattingEventArgs e)
{
    var row = dataGridView1.Rows[e.RowIndex];
    var stockCell = row.Cells["Stock"].Value;

    if (stockCell != null && int.TryParse(stockCell.ToString(), out int stock) && stock == 0)
    {
        e.CellStyle.BackColor = Color.MistyPink;
    }
}
まとめ
- 常に同じ見た目でよいなら DefaultCellStyle(列・行・DataGridView単位)
- 値によって見た目を変えたいなら CellFormattingイベント
- 行全体を強調したい場合は、対象セル以外のイベント発生時にも同じ行の別セルの値を参照して判定する
次回は、列ヘッダーをクリックしたときの並び替え(ソート)を扱います。
訪問数 57 回, 今日の訪問数 1回