WinForms ブロック崩しMVP チュートリアル
~記事4のコードを2段階に分けて整理しよう~
記事4で、パドル・ボール・ブロック・スコア・ゲームオーバーまでそろったブロック崩しが完成しました。ただし、Form1 の中にゲームの状態も、ルールも、入力も、描画も全部入っています。
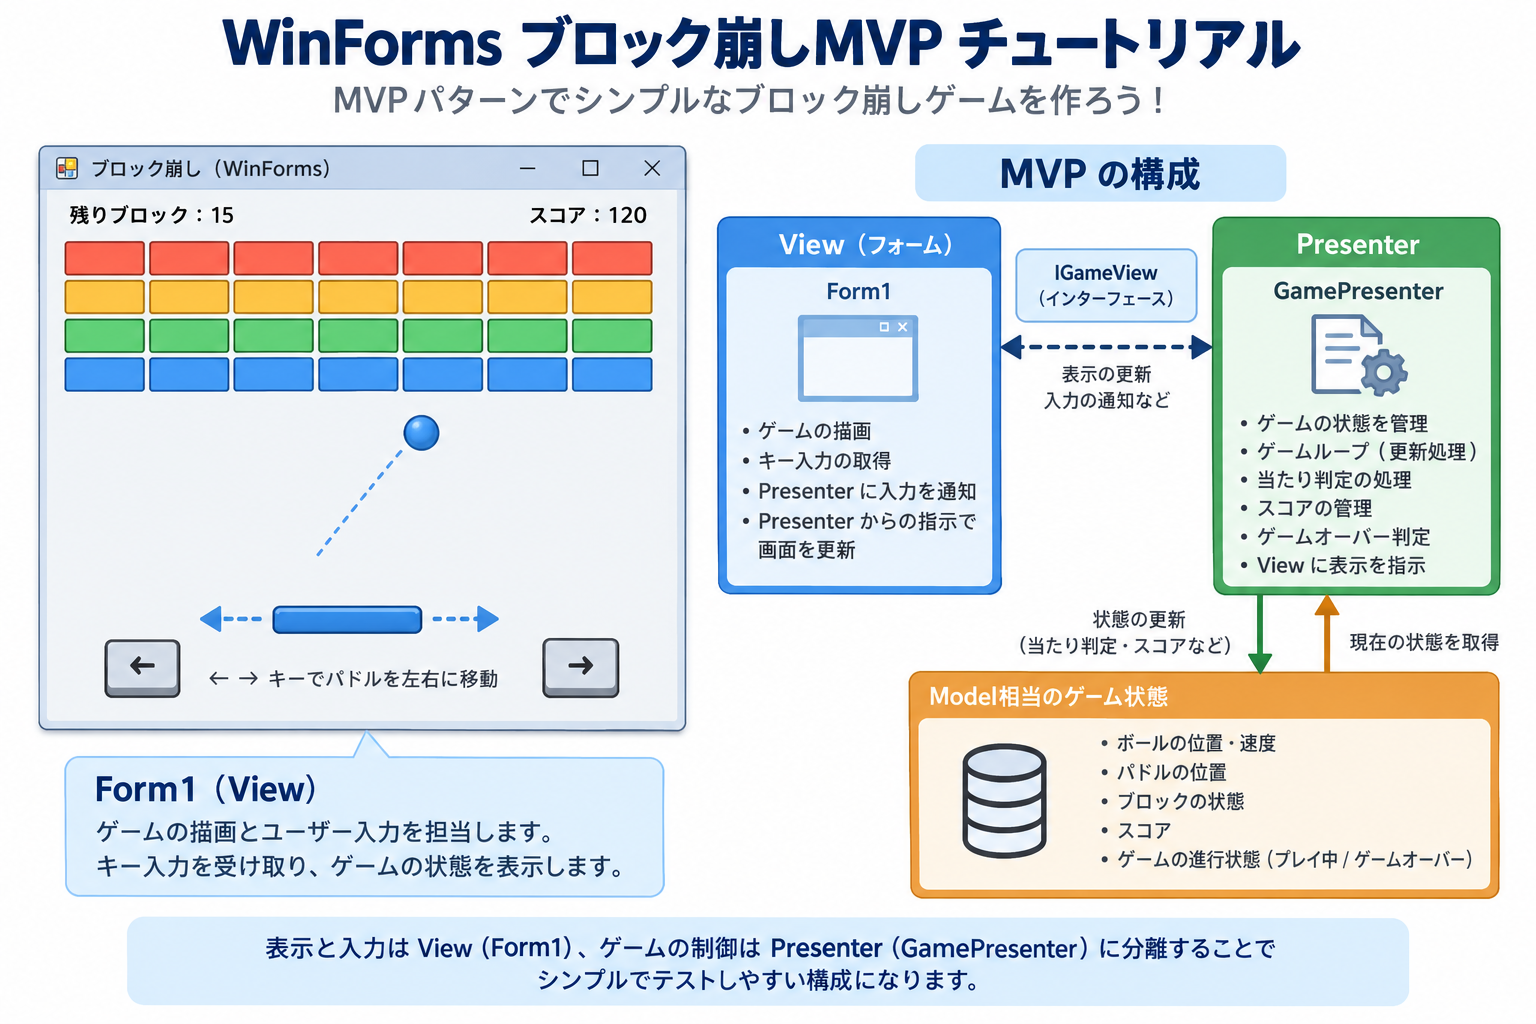
この記事では、動きは一切変えずにコードの置き場所を整理します。こうした「動作を変えずに構造だけ直す作業」をリファクタリングと呼びます。整理には MVP パターンを使います。
- Model:ゲームの状態とルール(パドル・ボール・ブロック・スコア・衝突判定)
- View:画面(
Form1)。キー入力を受け取り、描画する - Presenter:View と Model の仲介役
最後に、「分けると何が嬉しいのか」をテストで確かめます。
1. 準備
- 記事4が動く状態のプロジェクトを用意します(Git のブランチを切るか、フォルダをコピーしておくと安心です)。
- .NET 8 の Windows フォーム アプリ(C# 12) を前提にします。
Timerという名前は、.NET 6 以降の新しいテンプレートではSystem.Threading.Timerと衝突し、コンパイルエラー CS0104(Timerがあいまいな参照) になることがあります。そのためForm1.csの先頭に次の1行を入れます。
using Timer = System.Windows.Forms.Timer;- 新しく作るファイル(
GameModel.cs、IGameView.cs、GamePresenter.cs)は、Visual Studio の「追加 → クラス」で作ります。中身を全部貼り付けたあと、先頭のusingの下にnamespace (Form1.cs と同じ名前空間);を1行足してください。 Program.csとForm1.Designer.csは触りません。
2. 全体像:記事4のコードはどこへ行くか
記事4(Form1 に全部) | この記事での置き場所 |
|---|---|
| パドル・ボール・ブロック・スコア・ゲームオーバーなどの状態 | GameModel |
InitializeGame / InitializeBlocks | GameModel.Initialize |
UpdatePaddlePosition / UpdateBallPosition / CheckBallCollision | GameModel.Update にまとめる |
KeyDown / KeyUp と SetKeyState | Form1 がイベントで Presenter に伝え、GamePresenter が押下状態を保持 |
Timer_Tick | Form1 に残る(Presenter の UpdateGame() を呼ぶだけになる) |
OnPaint | Form1 に残る(描画に必要な値は Presenter から読む) |
記事4は、ゲームオーバーになると gameTimer.Stop() でタイマーを止めていました。この記事でも同じ動きになるよう、Form1 側でタイマーを止めています。
3. Step 1:Model を切り出す
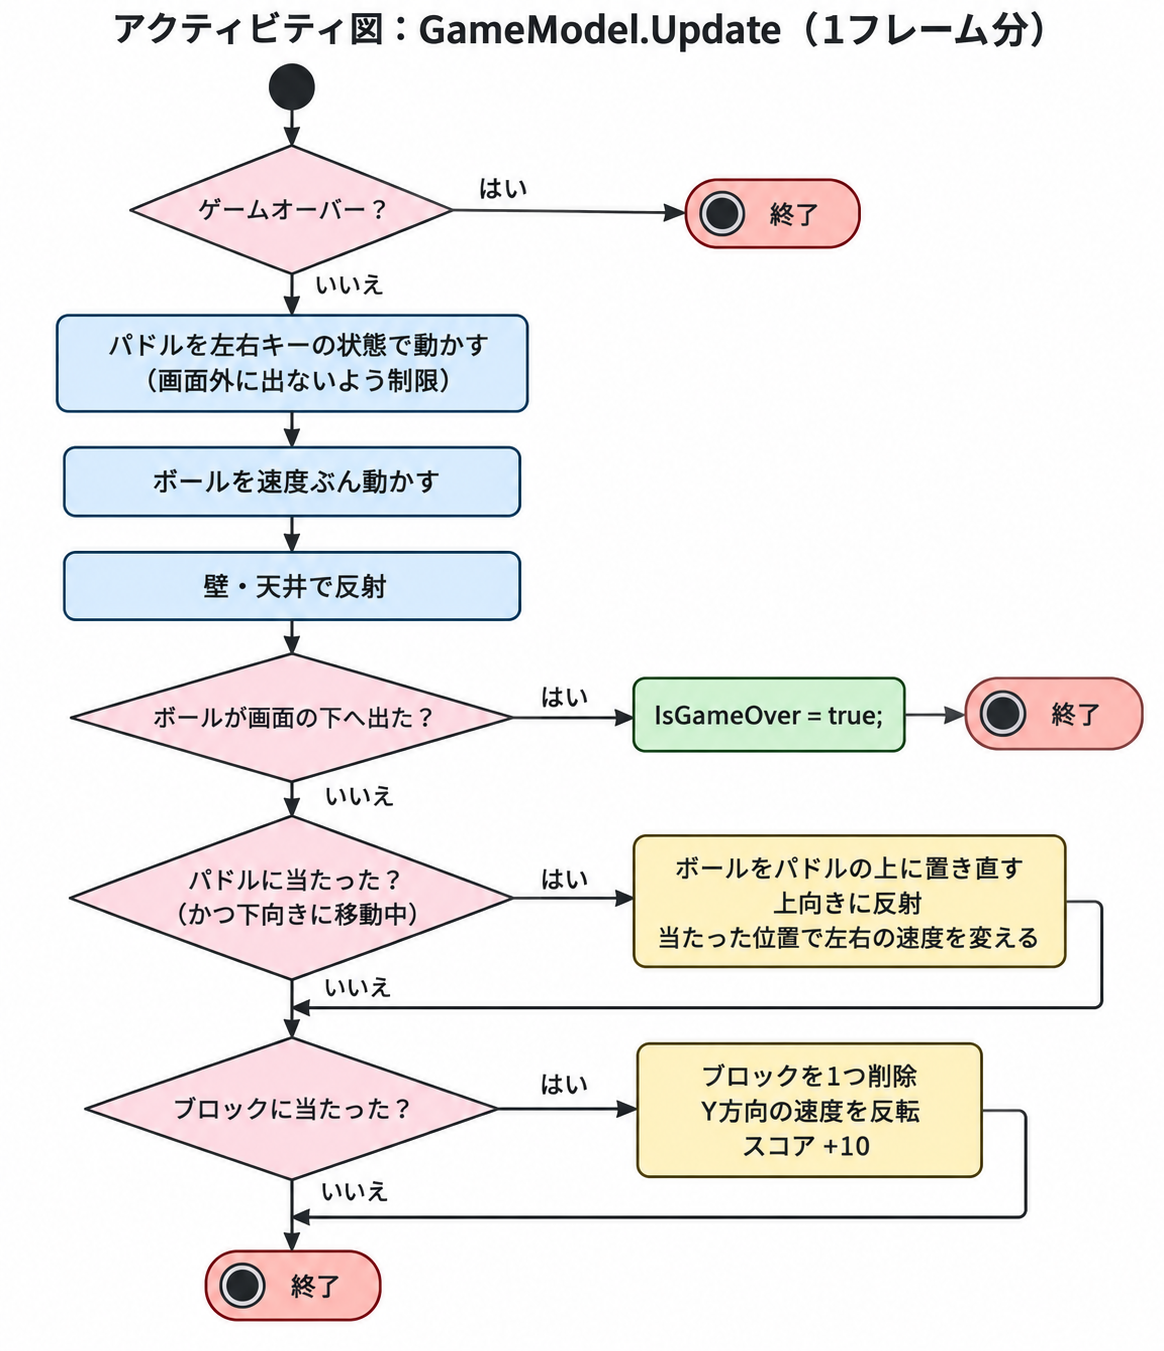
まず、ゲームの状態とルールを GameModel に移します。ここでは interface も Presenter もまだ使いません。
using System.Drawing;

/// <summary>ゲームの状態とルールだけを持つクラス。画面(Form)のことは何も知らない。</summary>
public class GameModel
{
    // 定数
    public const float PaddleWidth = 100.0f;
    public const float PaddleHeight = 20.0f;
    public const float PaddleSpeed = 5.0f;
    public const float PaddleBottomMargin = 30.0f; // パドルの下端から画面下までの余白
    public const float BallRadius = 10.0f;
    public const int BlockRows = 5;
    public const int BlockColumns = 10;
    public const float BlockWidth = 70;
    public const float BlockHeight = 20;
    public const float BlockPadding = 5;
    public const float BlockTopOffset = 50;

    private readonly List<RectangleF> blocks = new List<RectangleF>();
    private Size fieldSize;

    // 状態(テストで状況を作りやすいよう、あえて set を公開している)
    public float PaddleX { get; set; }
    public float BallX { get; set; }
    public float BallY { get; set; }
    public float BallVelocityX { get; set; }
    public float BallVelocityY { get; set; }
    public int Score { get; private set; }
    public bool IsGameOver { get; private set; }

    public IReadOnlyList<RectangleF> Blocks => blocks;

    // パドルとボールの矩形は Model が一か所で計算する(View や Presenter に数値を直書きしない)
    public RectangleF PaddleRect =>
        new RectangleF(PaddleX, fieldSize.Height - PaddleHeight - PaddleBottomMargin, PaddleWidth, PaddleHeight);

    public RectangleF BallRect =>
        new RectangleF(BallX - BallRadius, BallY - BallRadius, BallRadius * 2, BallRadius * 2);

    public void Initialize(Size fieldSize)
    {
        this.fieldSize = fieldSize;
        PaddleX = (fieldSize.Width - PaddleWidth) / 2;
        BallX = fieldSize.Width / 2;
        BallY = fieldSize.Height / 2;
        BallVelocityX = 3.0f;
        BallVelocityY = -3.0f;
        Score = 0;
        IsGameOver = false;
        InitializeBlocks();
    }

    private void InitializeBlocks()
    {
        blocks.Clear();
        float totalWidth = BlockColumns * BlockWidth + (BlockColumns - 1) * BlockPadding;
        float startX = (fieldSize.Width - totalWidth) / 2;
        for (int row = 0; row < BlockRows; row++)
        {
            for (int col = 0; col < BlockColumns; col++)
            {
                float x = startX + col * (BlockWidth + BlockPadding);
                float y = BlockTopOffset + row * (BlockHeight + BlockPadding);
                blocks.Add(new RectangleF(x, y, BlockWidth, BlockHeight));
            }
        }
    }

    /// <summary>1フレーム分ゲームを進める。記事4の Timer_Tick 内の処理と同じ動き。</summary>
    public void Update(Size fieldSize, bool isLeftPressed, bool isRightPressed)
    {
        if (IsGameOver) return;
        this.fieldSize = fieldSize;

        // パドル移動
        if (isLeftPressed) PaddleX -= PaddleSpeed;
        if (isRightPressed) PaddleX += PaddleSpeed;
        PaddleX = Math.Max(0, Math.Min(PaddleX, fieldSize.Width - PaddleWidth));

        // ボール移動
        BallX += BallVelocityX;
        BallY += BallVelocityY;

        // 壁との衝突
        if (BallX - BallRadius < 0)
        {
            BallX = BallRadius;
            BallVelocityX = -BallVelocityX;
        }
        else if (BallX + BallRadius > fieldSize.Width)
        {
            BallX = fieldSize.Width - BallRadius;
            BallVelocityX = -BallVelocityX;
        }
        if (BallY - BallRadius < 0)
        {
            BallY = BallRadius;
            BallVelocityY = -BallVelocityY;
        }
        else if (BallY - BallRadius > fieldSize.Height)
        {
            IsGameOver = true; // 下端を越えたらゲームオーバー
            return;
        }

        RectangleF ballRect = BallRect;

        // パドルとの衝突
        RectangleF paddleRect = PaddleRect;
        if (paddleRect.IntersectsWith(ballRect) && BallVelocityY > 0)
        {
            BallY = paddleRect.Top - BallRadius;
            BallVelocityY = -Math.Abs(BallVelocityY);
            float hitPos = (BallX - paddleRect.Left) / PaddleWidth;
            BallVelocityX = (hitPos - 0.5f) * 10;
        }

        // ブロックとの衝突(1フレームに1個まで)
        for (int i = 0; i < blocks.Count; i++)
        {
            if (blocks[i].IntersectsWith(ballRect))
            {
                blocks.RemoveAt(i);
                BallVelocityY = -BallVelocityY;
                Score += 10;
                break;
            }
        }
    }
}
ポイントは3つです。
using System.Windows.Forms;がありません。 Model は画面のことを何も知りません。SizeやRectangleFは、ただの数値のまとまり(データ型)なので使ってかまいません。- パドルとボールの矩形を Model が一か所で計算します。 記事4では「
ClientSize.Height - PaddleHeight - 30」のような計算を、Timer 側とOnPaint側の両方に書いていました。今後はPaddleRectを見るだけです。 PaddleXなどのsetを公開しているのは、後のテストで状況を作りやすくするためです(本格的な開発では、公開範囲をもっと絞ります)。
次に、Form1 を Model を使う形に差し替えます(Form1.cs のクラス本体だけを差し替え、namespace 行は変えません)。
using Timer = System.Windows.Forms.Timer; // .NET 6 以降で System.Threading.Timer と衝突するのを避ける

public partial class Form1 : Form
{
    private readonly GameModel model = new GameModel();
    private readonly Timer gameTimer = new Timer { Interval = 16 };
    private bool isLeftPressed;
    private bool isRightPressed;

    public Form1()
    {
        InitializeComponent();
        DoubleBuffered = true;
        ClientSize = new Size(800, 600);
        Text = "Breakout (Step 1: Model を分ける)";

        model.Initialize(ClientSize);

        KeyDown += (s, e) => SetKeyState(e.KeyCode, true);
        KeyUp += (s, e) => SetKeyState(e.KeyCode, false);

        gameTimer.Tick += GameTimer_Tick;
        gameTimer.Start();
    }

    private void SetKeyState(Keys key, bool isPressed)
    {
        if (key == Keys.Left) isLeftPressed = isPressed;
        else if (key == Keys.Right) isRightPressed = isPressed;
    }

    private void GameTimer_Tick(object? sender, EventArgs e)
    {
        model.Update(ClientSize, isLeftPressed, isRightPressed);
        Invalidate();
        if (model.IsGameOver) gameTimer.Stop();
    }

    protected override void OnPaint(PaintEventArgs e)
    {
        base.OnPaint(e);
        Graphics g = e.Graphics;
        g.Clear(Color.White);

        g.FillRectangle(Brushes.Blue, model.PaddleRect);
        g.FillEllipse(Brushes.Red, model.BallRect);

        foreach (RectangleF block in model.Blocks)
        {
            g.FillRectangle(Brushes.Green, block);
            g.DrawRectangle(Pens.Black, block.X, block.Y, block.Width, block.Height);
        }

        using (Font font = new Font("Arial", 14))
        {
            g.DrawString("Score: " + model.Score, font, Brushes.Black, 10, 10);
        }

        if (model.IsGameOver)
        {
            string text = "Game Over";
            using (Font font = new Font("Arial", 24))
            {
                SizeF size = g.MeasureString(text, font);
                g.DrawString(text, font, Brushes.Red,
                    (ClientSize.Width - size.Width) / 2,
                    (ClientSize.Height - size.Height) / 2);
            }
        }
    }
}動かしてみて、記事4とまったく同じ動きになることを確認してください。同じなら、Step 1 は成功です。
4. Step 2:View を抽象化して Presenter を挟む
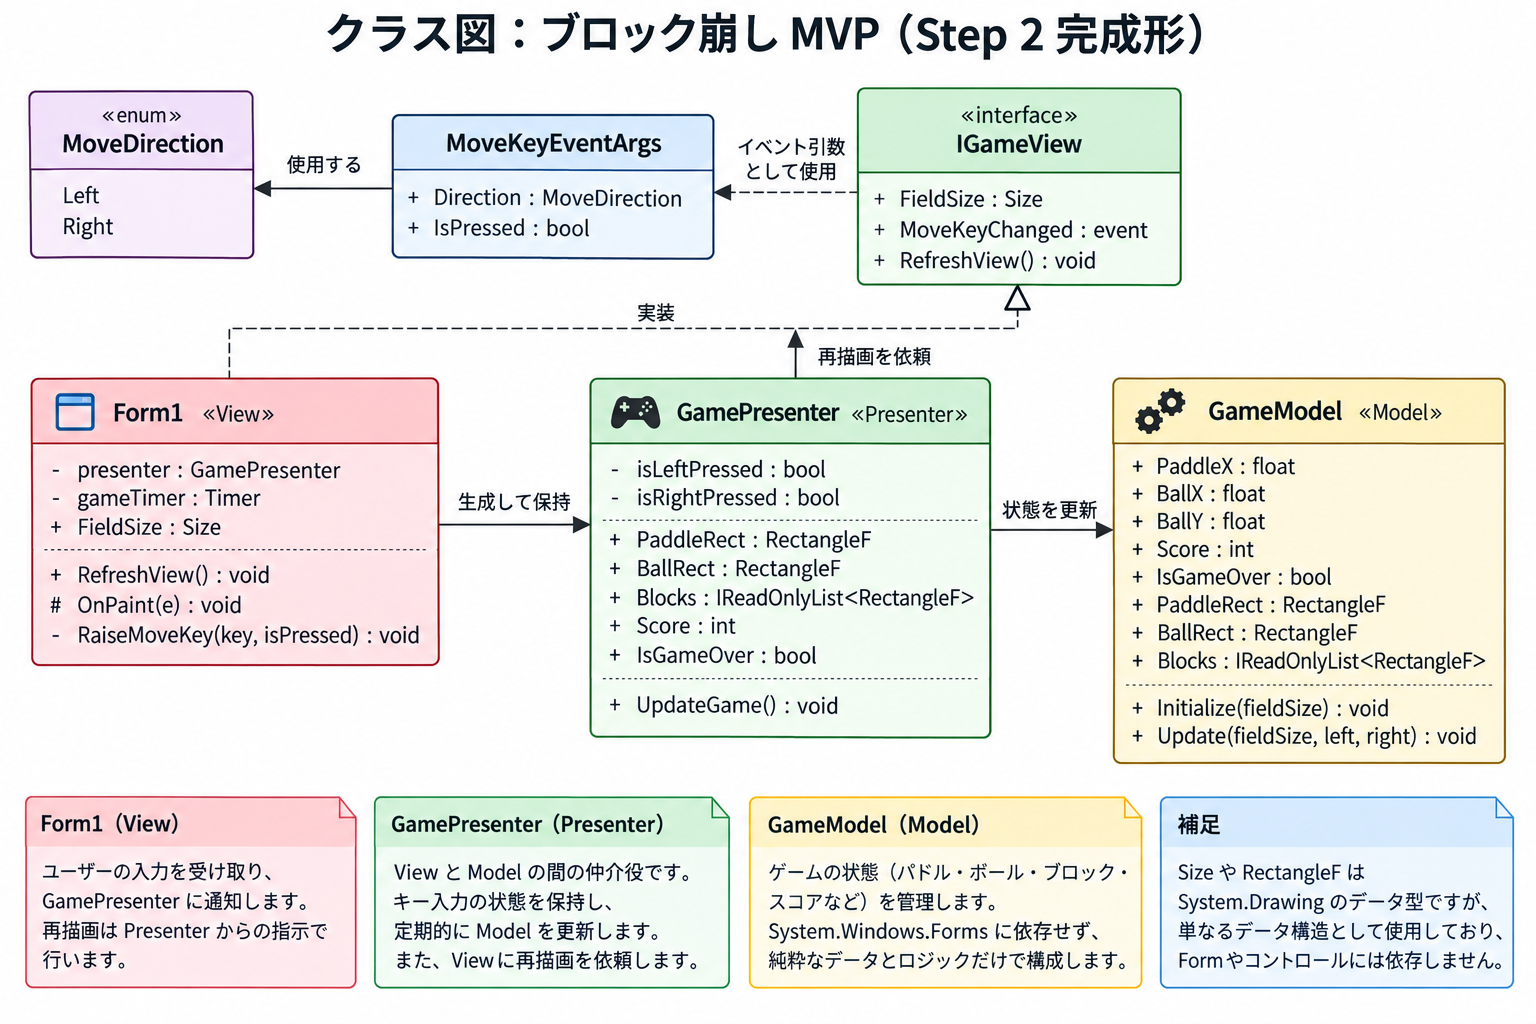
Step 1 の Form1 は、まだ Model を直接操作しています。次に、間に Presenter を入れます。
その前に、Presenter が View に求めることを IGameView(interface)としてまとめます。
public enum MoveDirection { Left, Right }

/// <summary>「左/右キーの押下状態が変わった」ことを表すイベントデータ。WinForms の Keys には依存しない。</summary>
public class MoveKeyEventArgs : EventArgs
{
    public MoveDirection Direction { get; }
    public bool IsPressed { get; }

    public MoveKeyEventArgs(MoveDirection direction, bool isPressed)
    {
        Direction = direction;
        IsPressed = isPressed;
    }
}

/// <summary>Presenter から見た「画面」。WinForms の型は一切出てこない。</summary>
public interface IGameView
{
    Size FieldSize { get; }                          // ゲーム画面の大きさ
    event EventHandler<MoveKeyEventArgs>? MoveKeyChanged; // 左右キーの状態が変わった
    void RefreshView();                              // 再描画してほしい
}ここで大事なのは、IGameView に WinForms の型が1つも出てこないことです。Keys や KeyEventArgs は使わず、「左/右キーの状態が変わった」という意味の MoveKeyEventArgs にしています。Keys.Left を MoveDirection.Left に翻訳するのは View の仕事です。
続いて GamePresenter です。
/// <summary>View からの入力を受け取り、Model を動かし、View に再描画を頼む。</summary>
public class GamePresenter
{
    private readonly IGameView view;
    private readonly GameModel model = new GameModel();
    private bool isLeftPressed;
    private bool isRightPressed;

    public GamePresenter(IGameView view)
    {
        this.view = view;
        model.Initialize(view.FieldSize);
        view.MoveKeyChanged += OnMoveKeyChanged;
    }

    private void OnMoveKeyChanged(object? sender, MoveKeyEventArgs e)
    {
        if (e.Direction == MoveDirection.Left) isLeftPressed = e.IsPressed;
        else isRightPressed = e.IsPressed;
    }

    /// <summary>ゲームを1フレーム進めて、View に再描画を頼む。</summary>
    public void UpdateGame()
    {
        model.Update(view.FieldSize, isLeftPressed, isRightPressed);
        view.RefreshView();
    }

    // View が描画に使う値
    public RectangleF PaddleRect => model.PaddleRect;
    public RectangleF BallRect => model.BallRect;
    public IReadOnlyList<RectangleF> Blocks => model.Blocks;
    public int Score => model.Score;
    public bool IsGameOver => model.IsGameOver;
}
Presenter は、キー入力を受け取り、Model を1フレーム進め、View に再描画を頼みます。ゲームのルールは Model にあり、Presenter は流れをつなぐだけです。
最後に Form1 を、IGameView を実装する形に差し替えます。
using Timer = System.Windows.Forms.Timer;

public partial class Form1 : Form, IGameView
{
    // --- IGameView の実装 ---
    public event EventHandler<MoveKeyEventArgs>? MoveKeyChanged;
    public Size FieldSize => ClientSize;
    public void RefreshView() => Invalidate();

    private readonly GamePresenter presenter;
    private readonly Timer gameTimer = new Timer { Interval = 16 };

    public Form1()
    {
        InitializeComponent();
        DoubleBuffered = true;
        ClientSize = new Size(800, 600);   // Presenter を作る前に大きさを決めておく
        Text = "Breakout MVP";

        // WinForms のキー (Keys) を、Presenter が理解できる「左/右」に翻訳して伝える
        KeyDown += (s, e) => RaiseMoveKey(e.KeyCode, true);
        KeyUp += (s, e) => RaiseMoveKey(e.KeyCode, false);

        presenter = new GamePresenter(this);

        gameTimer.Tick += GameTimer_Tick;
        gameTimer.Start();
    }

    private void RaiseMoveKey(Keys key, bool isPressed)
    {
        if (key == Keys.Left)
            MoveKeyChanged?.Invoke(this, new MoveKeyEventArgs(MoveDirection.Left, isPressed));
        else if (key == Keys.Right)
            MoveKeyChanged?.Invoke(this, new MoveKeyEventArgs(MoveDirection.Right, isPressed));
    }

    private void GameTimer_Tick(object? sender, EventArgs e)
    {
        presenter.UpdateGame();                        // 再描画は Presenter が RefreshView() で頼んでくる
        if (presenter.IsGameOver) gameTimer.Stop();
    }

    // 描画:Presenter が持っている値を読んで描くだけ
    protected override void OnPaint(PaintEventArgs e)
    {
        base.OnPaint(e);
        Graphics g = e.Graphics;
        g.Clear(Color.White);

        g.FillRectangle(Brushes.Blue, presenter.PaddleRect);
        g.FillEllipse(Brushes.Red, presenter.BallRect);

        foreach (RectangleF block in presenter.Blocks)
        {
            g.FillRectangle(Brushes.Green, block);
            g.DrawRectangle(Pens.Black, block.X, block.Y, block.Width, block.Height);
        }

        using (Font font = new Font("Arial", 14))
        {
            g.DrawString("Score: " + presenter.Score, font, Brushes.Black, 10, 10);
        }

        if (presenter.IsGameOver)
        {
            string text = "Game Over";
            using (Font font = new Font("Arial", 24))
            {
                SizeF size = g.MeasureString(text, font);
                g.DrawString(text, font, Brushes.Red,
                    (ClientSize.Width - size.Width) / 2,
                    (ClientSize.Height - size.Height) / 2);
            }
        }
    }
}処理の流れは次のとおりです。
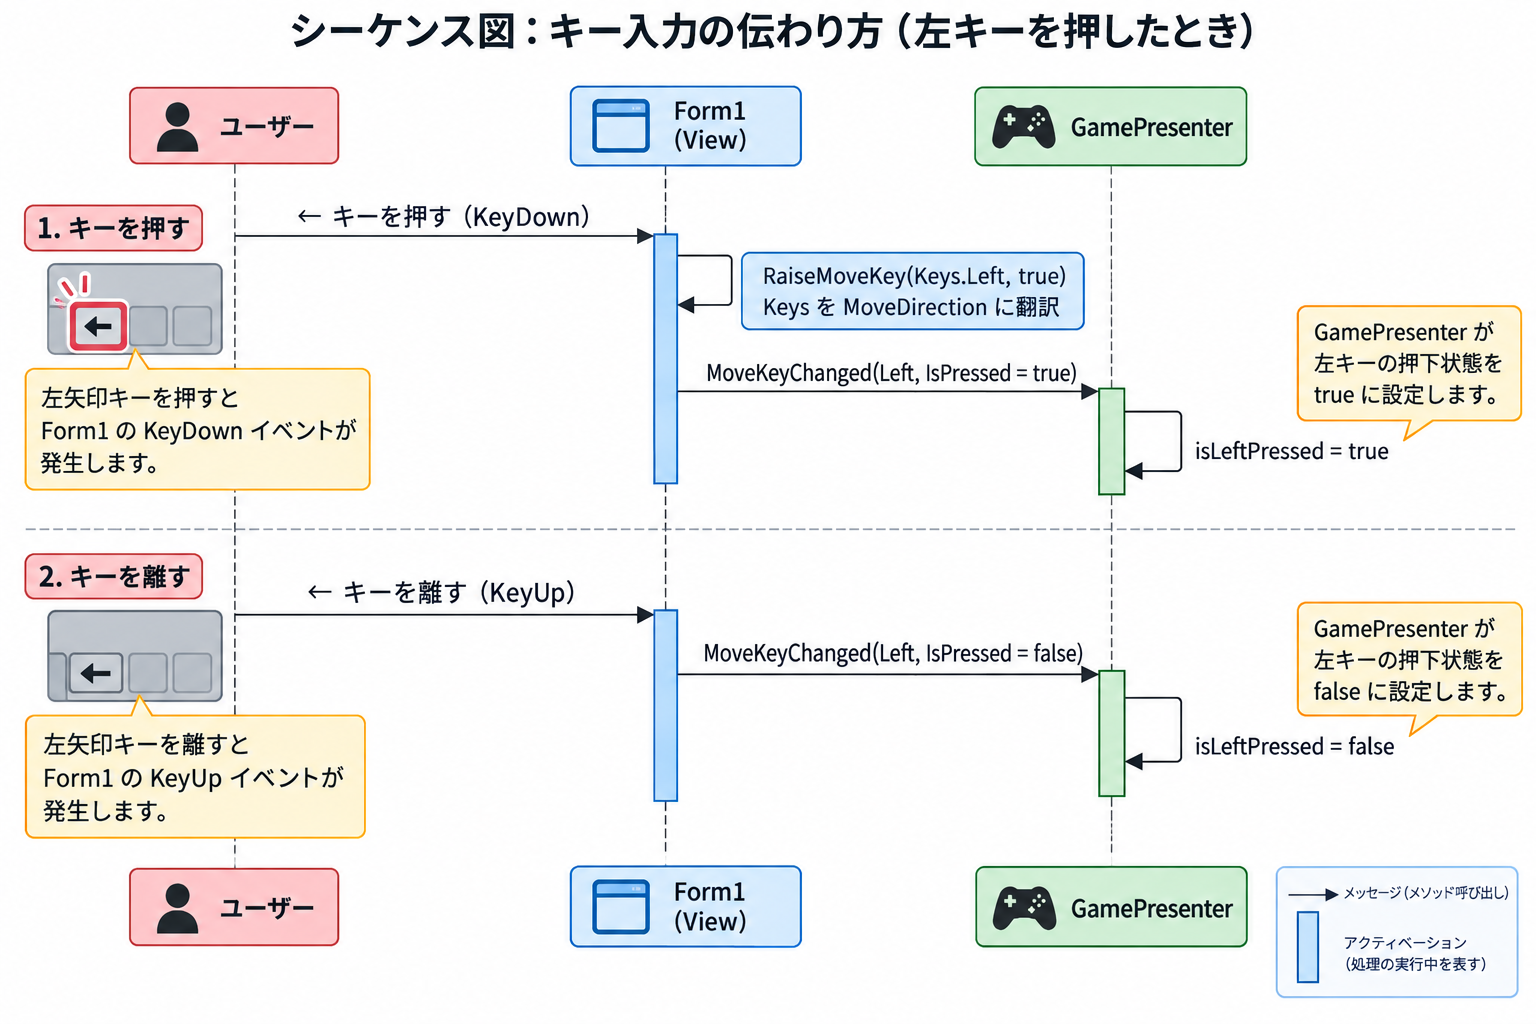
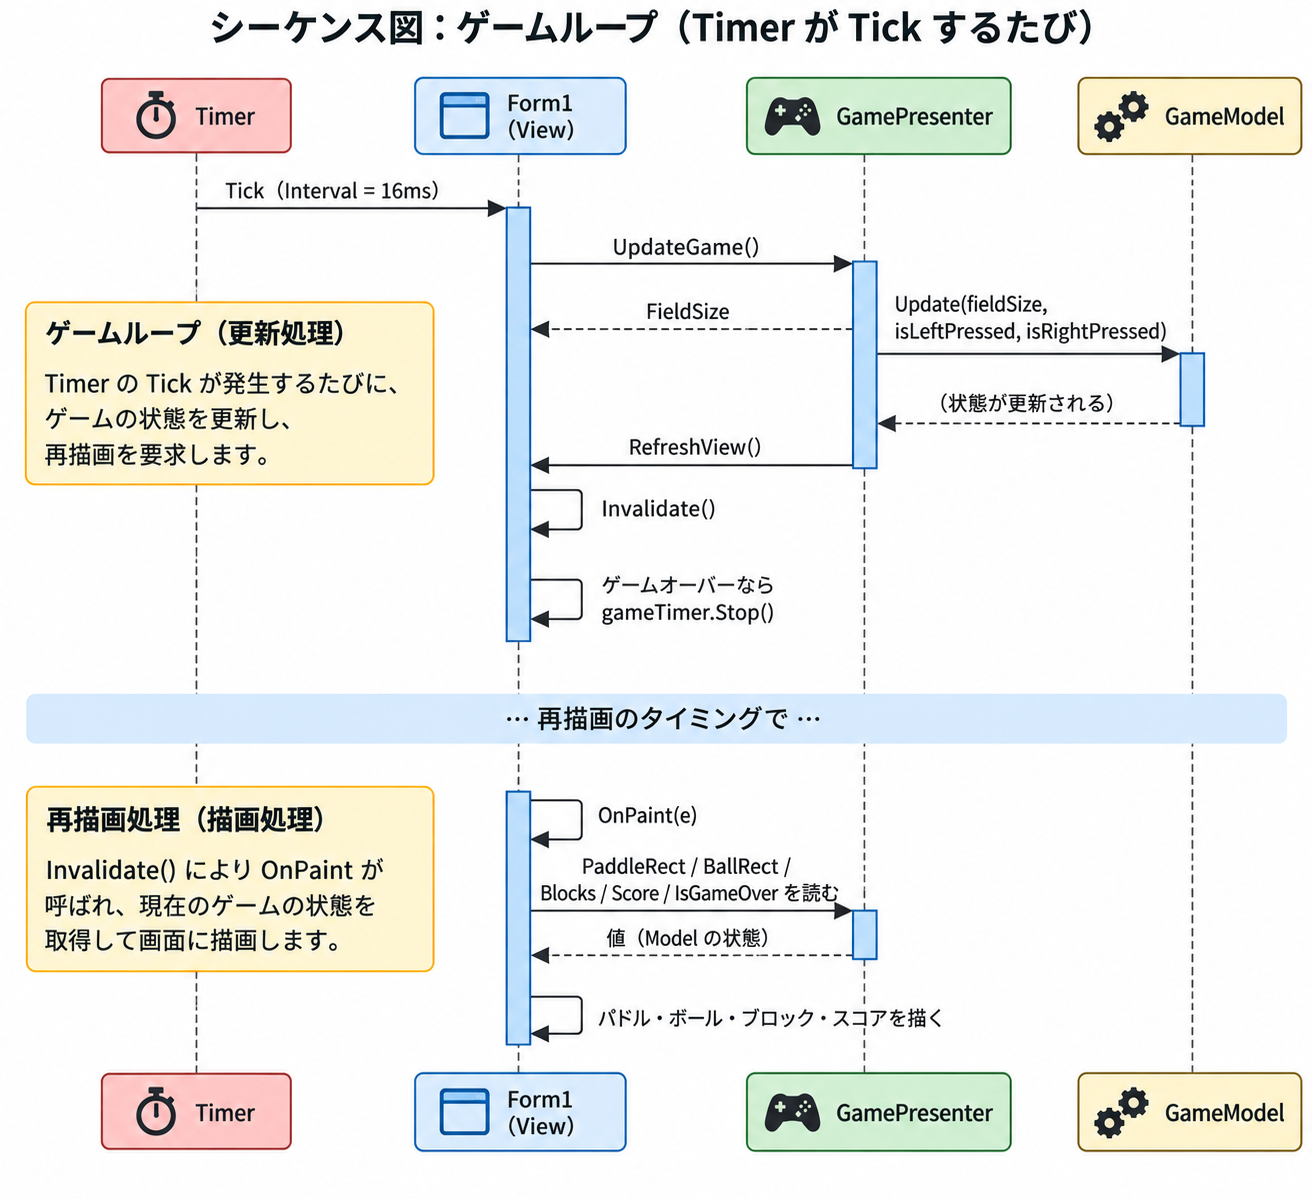
[キーを押す]  Form1.KeyDown → RaiseMoveKey → MoveKeyChanged イベント
                          → GamePresenter.OnMoveKeyChanged(押下状態を記録)

[タイマー]    Form1.GameTimer_Tick → presenter.UpdateGame()
                          → model.Update(...)      ゲームを1フレーム進める
                          → view.RefreshView()     Form1.Invalidate() で再描画を依頼
                          → Form1.OnPaint          Presenter の値を読んで描く
5. 分けると何が嬉しいのか:テストを書いてみよう
Model と Presenter は WinForms を知らないので、Form を1つも起動せずにゲームのルールを確かめられます。
Visual Studio で「xUnit テスト プロジェクト」を追加し、WinForms プロジェクトへの参照を加えます。次のテストを書いてみましょう。
- テストファイルの先頭には、
GameModelなどがある名前空間のusingを必ず足します(例:WinForms プロジェクトの名前空間がBreakoutMvpならusing BreakoutMvp;)。dotnet new xunitで作成したテストプロジェクトは、既定でBreakoutMvp.Testsのような「内側」のRootNamespaceになりますが、これはあくまで新規ファイルを追加したときにVisual Studioが提案する既定値であり、このテストファイル自体を自動的にその名前空間の中に入れてくれるわけではありません。usingを省略すると、GameModelやIGameViewなどの型が見つからずCS0246エラーになります。 - 参照を加えたときにエラーになる場合は、テストプロジェクトの
TargetFrameworkをnet8.0-windowsにそろえます。
using System.Drawing;
using Xunit;

public class GameModelTests
{
    private static GameModel CreateModel()
    {
        var model = new GameModel();
        model.Initialize(new Size(800, 600));
        return model;
    }

    [Fact]
    public void 初期状態は50個のブロックでスコア0()
    {
        var model = CreateModel();

        Assert.Equal(50, model.Blocks.Count);
        Assert.Equal(0, model.Score);
        Assert.False(model.IsGameOver);
    }

    [Fact]
    public void ボールが画面の下へ出たらゲームオーバー()
    {
        var model = CreateModel();
        model.BallY = 615;          // 画面下端(600)より十分下
        model.BallVelocityY = 3;

        model.Update(new Size(800, 600), false, false);

        Assert.True(model.IsGameOver);
    }

    [Fact]
    public void パドルは左端で止まる()
    {
        var model = CreateModel();

        for (int i = 0; i < 100; i++)
            model.Update(new Size(800, 600), true, false);

        Assert.Equal(0f, model.PaddleX);
    }

    [Fact]
    public void ブロックに当たるとブロックが1つ減りスコアが10増える()
    {
        var model = CreateModel();
        RectangleF first = model.Blocks[0];
        model.BallX = first.X + first.Width / 2;
        model.BallY = first.Y + first.Height / 2;
        model.BallVelocityX = 0;
        model.BallVelocityY = -3;

        model.Update(new Size(800, 600), false, false);

        Assert.Equal(49, model.Blocks.Count);
        Assert.Equal(10, model.Score);
        Assert.Equal(3f, model.BallVelocityY); // 上向き → 下向きに反転
    }

    [Fact]
    public void パドルの中央で受けると真上に跳ね返る()
    {
        var model = CreateModel();      // パドルは画面中央 (X=350..450)
        model.BallX = 400;
        model.BallY = 545;
        model.BallVelocityX = 3;
        model.BallVelocityY = 3;

        model.Update(new Size(800, 600), false, false);

        Assert.True(model.BallVelocityY < 0);
        Assert.InRange(model.BallVelocityX, -1.5f, 1.5f); // ほぼ真上(中央付近)
    }
}

public class GamePresenterTests
{
    private class FakeView : IGameView
    {
        public Size FieldSize { get; set; } = new Size(800, 600);
        public event EventHandler<MoveKeyEventArgs>? MoveKeyChanged;
        public int RefreshCount { get; private set; }

        public void RefreshView() => RefreshCount++;
        public void Press(MoveDirection direction, bool isPressed) =>
            MoveKeyChanged?.Invoke(this, new MoveKeyEventArgs(direction, isPressed));
    }

    [Fact]
    public void 左キーを押して更新するとパドルが左へ動き_再描画が1回要求される()
    {
        var view = new FakeView();
        var presenter = new GamePresenter(view);
        float before = presenter.PaddleRect.X;

        view.Press(MoveDirection.Left, true);
        presenter.UpdateGame();

        Assert.True(presenter.PaddleRect.X < before);
        Assert.Equal(1, view.RefreshCount);
    }

    [Fact]
    public void キーを離すとパドルは止まる()
    {
        var view = new FakeView();
        var presenter = new GamePresenter(view);

        view.Press(MoveDirection.Right, true);
        presenter.UpdateGame();
        view.Press(MoveDirection.Right, false);
        float stopped = presenter.PaddleRect.X;
        presenter.UpdateGame();

        Assert.Equal(stopped, presenter.PaddleRect.X);
    }
}GameModelTestsは、ボールが下へ出たらゲームオーバー、ブロックに当たったらスコアが10増える、といったルールそのものを確かめています。GamePresenterTestsのFakeViewは、画面の代わりをする偽物です。IGameViewに WinForms の型が出てこないので、こういう偽物を簡単に作れます。もし interface にKeyEventArgsが残っていたら、テストのたびに WinForms の型を組み立てる必要がありました。
テストを実行して、すべて緑になることを確認してください。
6. まとめ
- リファクタリングは、動きを変えずに構造だけ直す作業です。Step 1 のあとも Step 2 のあとも、ゲームの動きは記事4と同じままです。
- Model は状態とルール、View は入力と描画、Presenter は両者の仲介、と責務を分けました。
- View と Presenter のあいだを interface で切ると、画面なしでルールをテストできます。
7. 練習問題
どれも、変更するのはほぼ GameModel だけで済みます。ここが分けたことの効果です。
- リスタート:ゲームオーバー後にスペースキーで再開できるようにしましょう。ヒント:Model の
Initializeをもう一度呼ぶだけです(Form1側ではタイマーの再開も必要です)。 - ゲームクリア:ブロックが全部なくなったらクリア表示にしましょう。
IsGameClearのようなプロパティを Model に足します。 - ブロックの側面ヒット:今はブロックのどこに当たっても縦方向(Y)の速度を反転しています。横から当たったときは、X を反転するにはどうすればよいでしょうか。
- 一定速度の反射:パドルで跳ね返すたびに速度(斜めの速さ)が変わってしまいます。どう直せばよいでしょうか。
- 各機能のテスト:1〜4 のそれぞれについて、テストを1つ書いてから実装してみましょう。
このMVPパターンの考え方を、4人チームで役割分担しながら実践する記事もあります:4人チームでブロック崩しを作る(Gitチーム開発×MVPパターン発展)